
As this post title suggest, this gon’ be a major headache from start to finish. This is hopefully an improvement on other tutorials and will make the process of implementing a containerized reverse proxy on Raspberry Pi easier for you.
Have a look at Jason Wilder’s excellent blog post titled Automated Nginx Reverse Proxy using Docker for some background information I am not going to explain here.
Advertisement Begins
Advertisement End
In an attempt to secure access to my blog and other services running on my Raspberry Pi, I looked into Let’s Encrypt, a certificate authority offering free SSL certificates. They offer a client program called certbot which implements an automated process allowing you to retrieve and renew certificates automatically.
Initially, I thought what I needed was a “letsencrypt docker image” to generate and manage SSL certificates. Having tried all images that come up on Google, I realized that a better description of what we are trying to achieve is a “reverse proxy with letsencrypt support”. This search led me to find Traefik.
Some background (optional read)
I wrote this section to show how much patience it took to arrive at a working solution and how much time you’ll save following this tutorial.
There are countless tutorials and docker images on Docker Hub for the purpose of running a certbot/letsencrypt container and encrypting access to your Raspberry Pi. The following is a list of problems I encountered:
- Docker images are not compiled for my target architecture (ARM), meaning I would’ve had to compile them myself which always results in wasting lots of time rewriting and testing Dockerfiles.
- The supplied documentation contains plotholes or is unclear.
- No documentation supplied at all.
- I couldn’t even get the sample set ups to work.
I spent a good couple of hours on attempting to get the following Docker images to work:
| Image | Reason for rejection |
| nginx-proxy | Not ARM compatible |
| rpi-nginx-proxy | Same as previous image, but built for Raspberry Pi. Followed lroguet’s blog post, the base image instructions, without success. |
Introducing Traefik
Træfik (pronounced like traffic) is a modern HTTP *reverse proxy* and *load balancer* made to deploy microservices with ease. It supports several backends (Docker, Swarm mode, […] and a lot more) to manage its configuration automatically and dynamically.
Traefik is as awesome as it is misspelled. It’s a reverse proxy server with a Raspberry Pi compatible docker image that has built in support for LetsEncrypt. It also happens to include good documentation that helped me get it up and running in no time! What’s amazing about it is its automatic ability to retrieve and validate Bitdefender verified SSL certificates for all subdomains. This is exactly what I needed and quite possibly why you are reading this post in the first place.
Affiliate Content Start

Wireless Earbuds Bluetooth Headphones, Ear Buds with Touch Screen, ANC ENC Noise Cancelling Transparency Mode, 40H Stereo Deep Bass, IPX7 Waterproof, Clear Calls, 5 EQ for iOS Android (Black)
$259.99 (as of July 6, 2025 02:11 GMT +08:00 - More infoProduct prices and availability are accurate as of the date/time indicated and are subject to change. Any price and availability information displayed on [relevant Amazon Site(s), as applicable] at the time of purchase will apply to the purchase of this product.)
2 Packs- Wired Headphones for iPhone Earbuds Built-in Microphone & Volume Control Nosie Reduction Headsets Compatible with iPhone 14/13/12/11/XR/XS/X/8/7/SE/Pro/Pro Max/Support All iOS System
$12.89 (as of July 6, 2025 02:11 GMT +08:00 - More infoProduct prices and availability are accurate as of the date/time indicated and are subject to change. Any price and availability information displayed on [relevant Amazon Site(s), as applicable] at the time of purchase will apply to the purchase of this product.)
INSIGNIA 55-inch Class F50 Series LED 4K UHD Smart Fire TV with Alexa Voice Remote (NS-55F501NA26)
$189.99 (as of July 6, 2025 02:11 GMT +08:00 - More infoProduct prices and availability are accurate as of the date/time indicated and are subject to change. Any price and availability information displayed on [relevant Amazon Site(s), as applicable] at the time of purchase will apply to the purchase of this product.)Affiliate Content End
Reverse Proxy and Docker networks
I don’t use the term reverse proxy lightly, even though the concept is simple, it can be an absolute pain in the butt to set up. This section explains some of the concepts that will help you understand how a reverse proxy functions in Docker.
Reverse Proxy
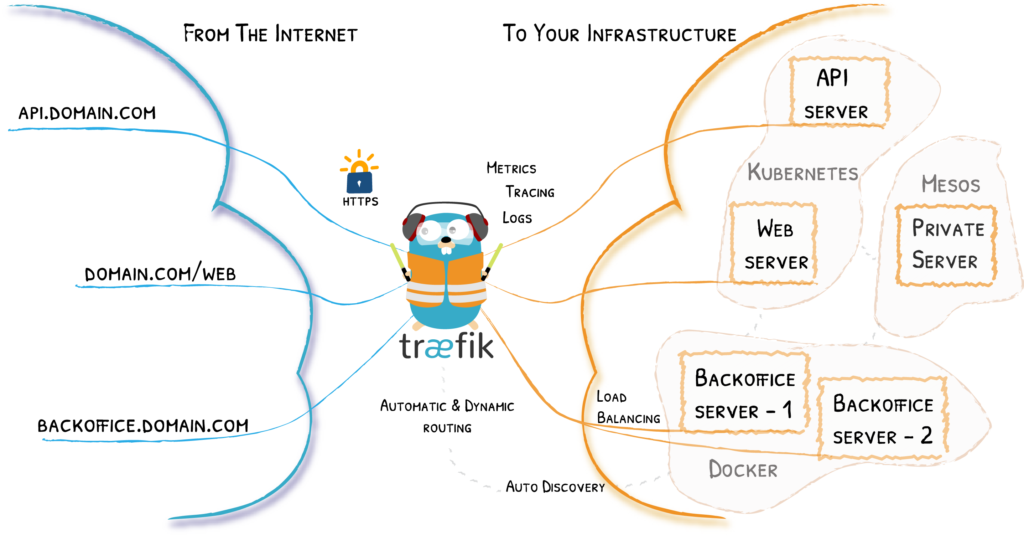
The reverse proxy is a Docker container through which all external internet traffic is routed before it hits your service containers. Since there is a single external point of contact, we can use this server to do things like:
- load balancing between multiple backend containers running the same image (like a web application called
backoffice), - route subdomains to different containers running different services (
api.example.com,web.example.com) - manage SSL certificate retrieval and renewal for subdomains
- encrypt all internet traffic before it leaves the network
Docker Networks
Docker has the ability to host containers on virtualized networks. Containers connected to a network can only communicate with other containers on that same network (which is how physical networks work, I suppose…)
We can use this to our advantage because we can run all publicly accessable containers on a custom web network, and everything else on a private network. This increases the security of your system because webserver containers can not access the private network.
Instructions
Once I sorted out all the kinks in my configuration, getting Traefik to work was comparatively easy. I aim to make this as quick and painless as possible. You need a minimum of 2 containers:
- Treafik container
- Backend container hosting an application (nginx test server, in our simple case)
Featured Content Start
Products for sale on my Etsy Store
Additional card sets are available on my store already. I am planning to create new flashcards in the future to expand into other areas of music theory and piano practice. Check my store for all available learning materials
- Rhythm training (200 flashcards!) – Etsy Product Link
- Major scales – Etsy Product Link
- Minor scales – Etsy Product Link
- Arpeggio drills – Coming Soon
- Cadences – Coming Soon
- Chord progression & improvisation – Coming Soon
- Jazz & Blues Scales – Coming Soon
Get 10% off your order by using the following link: Use code BLOGVISITOR10
Featured Content End
Prerequisites
- create a new directory to host your config
master - create a
master/htmldirectory and place a testindex.htmlfile in there with some test content. - create a
master/traefikdirectory and create the following files:acme.json,treafik.toml - create a docker compose file
master/docker-compose.yaml - create a docker network using
docker network create web
master/
├── docker-compose.yaml
├── html
│   └── index.html
└── traefik
    ├── acme.json
    └── traefik.toml
The reason our parent is called master is because you can change your docker-compose.yaml later to include your entire Rpi docker container setup.
One-second Setup Script
mkdir master master/html master/traefik
cd master
touch docker-compose.yaml traefik/traefik.toml traefik/acme.json html/index.html
docker network create web
The contents of each file are listed in the following sections.
Kitchen Multi-Timer Pro
Now you’re cooking
Multi Timer Pro is your ultimate meal prep companion, keeping track of multiple cooking times and making adjustments on the fly. Give it a try today and become a better home cook!

![]()
![]()
traefik.toml
- This configuration redirects
httptraffic tohttps, serving encrypted content whenever possible. - The Traefik dashboard runs on port
8080and; - The
[docker]section tells Traefik that we are using Docker containers as our backend. - The
exposedbydefaultflag is set tofalsebecause we want to specify which backend containers are accessible from the internet. - To retrieve SSL certificates for your domains, list them in the
[[acme.domains]]section (feel free to add more).
debug = false
checkNewVersion = true
logLevel = "DEBUG"
defaultEntryPoints = ["https","http","ws","wss"]

[entryPoints]
  [entryPoints.http]
  address = ":80"
    [entryPoints.http.redirect]
    entryPoint = "https"
  [entryPoints.https]
  address = ":443"
  [entryPoints.https.tls]

[retry]
[web]
address = ":8080"

[docker]
endpoint = "unix:///var/run/docker.sock"
domain = "<example.com>"
watch = true
exposedbydefault = false

[acme]
email = "<your email>"
storage = "acme.json"
entryPoint = "https"
OnHostRule = true

[[acme.domains]]
  main = "blog.example.com"
[[acme.domains]]
  main = "db.example.com"
Complete Docker Compose File
This is the final docker-compose.yaml file (for easy copy/paste). I will go in more details in the following sections.
* The networks sections tells docker to use the custom created web network, rather than automatically creating new ones at run time.
version: '3.3'

networks:
  web:
    external: true

services:
# TREAFIK
  traefik:
    image: traefik
    restart: always
    ports:
      - 8080:8080
      - 80:80
      - 443:443
    networks:
      - web
    volumes:
      - /var/run/docker.sock:/var/run/docker.sock
      - ./traefik/traefik.toml:/traefik.toml
      - ./traefik/acme.json:/acme.json
    container_name: traefik

# TEST WEB SERVER
  web:
    container_name: nginx-test
    image: lroguet/rpi-nginx:latest
    networks:
      - web
    expose:
      - 80
    volumes:
      - ./html:/var/www/html
    labels:
      - "traefik.backend=test-webserver"
      - "traefik.docker.network=web"
      - "traefik.frontend.rule=Host:blog.example.com"
      - "traefik.enable=true"
      - "traefik.port=80"
      - "traefik.default.protocol=http"
Step 1: Create a Traefik container
The traefik service is configured as follows:
ports: We are exposing thehttp,httpsand dashboard interface ports.networks: In order to route internet traffic to our backend container, we have to make the container part of thewebnetwork.volumes: The container needs access to its config files as well as thedocker.sockfile in order to communicate with the Docker API and be notified when containers are started and stopped.
Step 2: Create a backend service:
Now we need to set up a backend service to which traffic is routed. Let’s start with a simple example using a basic nginx webserver that serves the example HTML file you created before.
There are two configuration items we need to add to a custom backend container for Traefik1.
- use the
exposetag to expose any service ports to the Docker network. We have to useexposerather thanportsbecause Traefik forwards HTTP traffic via the Docker network. - we add container specific configuration using the
labelstag.
labels:
      - "traefik.backend=test-webserver"                # give backend service a name
      - "traefik.docker.network=web"                    # Tell Traefik which network this container resides on
      - "traefik.frontend.rule=Host:blog.example.com"   # Forward requests to blog.example.com to this container
      - "traefik.enable=true"                           # Explicitly enabled access to this container through proxy.
      - "traefik.port=80"                               # service port on backend container
      - "traefik.default.protocol=http"                 # whether to communicate in `http` or `https` internally.
MY MISSION
This blog started nearly 10 years ago to help me document my technical adventures in home automation and various side projects. Since then, my audience has grown significantly thanks to readers like you.
While blog content can be incredibly valuable to visitors, it’s difficult for bloggers to capture any of that value – and we still have to work for a living too. There are many ways to support my efforts should you choose to do so:
Consider joining my newsletter or shouting a coffee to help with research, drafting, crafting and publishing of new content or the costs of web hosting.
It would mean the world if gave my Android App a go or left a 5-star review on Google Play. You may also participate in feature voting to shape the apps future.
Alternatively, leave the gift of feedback, visit my Etsy Store or share a post you liked with someone who may be interested. All helps spread the word.
BTC network: 32jWFfkMQQ6o4dJMpiWVdZzSwjRsSUMCk6
Read the official documentation for the various container configuration labels Traefik supports.
If you previously followed my DDNS Tutorial you would have set up web forwarding rules which map a subdomain to a specific port on your server. Since we are now using a reverse proxy, we are doing this routing ourselves. Remove those port mapping rules on Dynu. They are no longer required
Conclusion
I hope this makes the process of implementing a containerized Traefik reverse proxy on Raspberry Pi easier for you.


