In the world of self-hosting and home servers, having a reliable backup strategy is paramount. If you’re running KVM virtual machines (VMs) in your home lab, you know that manually backing up these VMs can be a time-consuming task. But what if you could automate the entire process? That’s where this Bash script comes in. This script will help you save valuable time and ensure the safety of your data in case of any unforeseen disasters.
The Need for Automation
Manually backing up VMs in your home lab can be a tedious and error-prone task. You have to stop each VM, copy its disk image and configuration files, and then restart it. This process can be especially challenging if you have multiple VMs running. That’s where automation comes to the rescue.
Introducing this Bash script I created to simplify the backup process for your KVM VMs. With this script, you can ensure that your VMs are backed up regularly, allowing you to focus on other important tasks in your home lab.
Creating the KVM Virtual Machine Backup Script
Let’s dive into how this script works. It comprises 2 scripts, one for managing the VM and another for performing the actual file management.
Advertisement Begins
Advertisement End
backup-vm.sh
#!/bin/bash
# Purpose:   Backup KVM Virtual Machines by first stopping the VM and the calling the backup script.
# Usage:     backup-vm.sh machinename datadir
# Usage Ex:     backup-vm.sh opensense-2022 OpnSense
# Version:   1.0

# BASIC CONFIG START
NAME=$1

# BASIC CONFIG END
VM_DATA_ROOT=/mnt/ssd/domains

VM_DATA_DIR=$VM_DATA_ROOT/$2

echo "VM Name:      $NAME"
echo "VM Data Dir:  $VM_DATA_DIR"


virsh list --all

virsh dominfo  $NAME
virsh domblklist  $NAME
virsh dumpxml $NAME > xmldump.xml


virsh shutdown $NAME


# Wait till instance shutdown gracefully
until sudo virsh domstate $NAME | grep shut; do
    echo " ${NAME} still running"
    sleep 10
done


echo "Args:  $NAME $VM_DATA_DIR xmldump.xml"

sudo /mnt/ssd/scripts/file-mover.sh $NAME $VM_DATA_DIR xmldump.xml


virsh start $NAME
until sudo virsh domstate $NAME | grep running; do
    echo " ${NAME} starting up..."
    sleep 10
done
file-mover.sh
#!/bin/bash
# file-mover.sh <VM NAME> <domain data folder> <source n>

BACKUP_ROOT=/mnt/backup/BACKUPS_VMS
LOGS=/var/log/crontab

NAME=$1
TIME=`date +%Y-%m-%d-%H%M%S`
FOLDERNAME=$TIME-$NAME-backup
BACKUP_TARGET=$BACKUP_ROOT/$NAME
BACKUP_TARGET_FOLDERNAME=$BACKUP_TARGET/$FOLDERNAME

echo "NAME:                   $NAME"
echo "BACKUP_TARGET:          $BACKUP_TARGET"
echo "FOLDERNAME:               $FOLDERNAME"
echo "BACKUP_TARGET_FOLDERNAME: $BACKUP_TARGET_FOLDERNAME"
echo "To be backed up: ${@:2}"

if [ ! -d $LOGS ]; then
  echo "$LOGS does not exist. Creating."
  mkdir -p $LOGS
fi

if [ ! -d $BACKUP_TARGET_FOLDERNAME ]; then
  echo "$BACKUP_TARGET_FOLDERNAME does not exist. Creating."
  mkdir -p $BACKUP_TARGET_FOLDERNAME
fi

cp -r ${@:2} $BACKUP_TARGET_FOLDERNAME

exit 0W
In the following sections, I’ll explain the functionality of the script and provide detailed instructions on how to set it up and customize it to your needs.
How the Script Works
The script operates in a straightforward manner:
- Graceful VM Shutdown: It first gracefully shuts down the VM to ensure data consistency.
- Configuration Snapshot: The script takes a snapshot of the VM’s configuration, preserving its settings.
- Saving Configuration and Disk Image: Both the configuration snapshot and the disk image are then saved to a designated backup directory.
- VM Restart: Finally, the script restarts the VM, ensuring minimal downtime.
Script Usage and Configuration
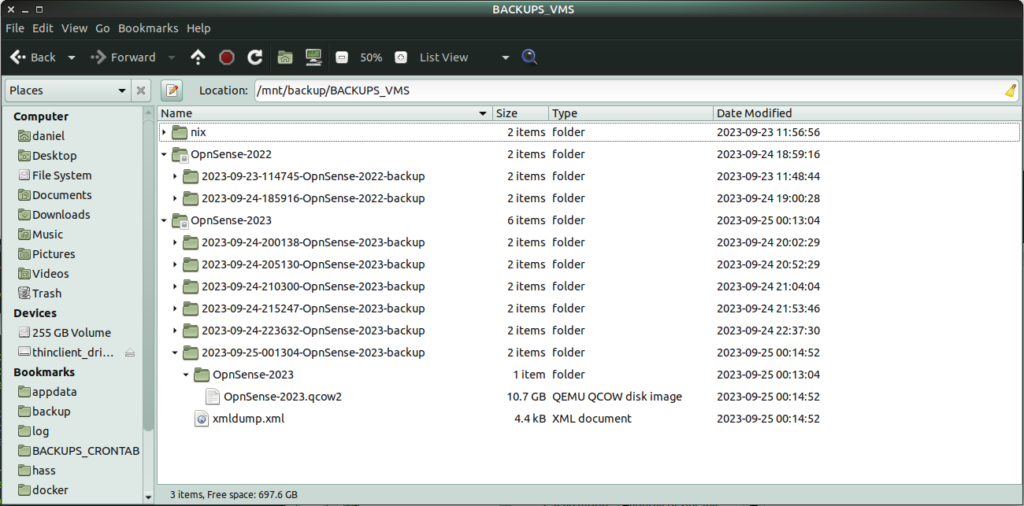
To get started with this script, you’ll need to configure it to match your home lab setup. You can adjust backup destinations, naming conventions, and more to suit your preferences. Once configured it produces the following folder structure.
As you can see, during my OpnSense upgrade I created multiple VM backups.
Scheduling Backups with Cron
Automation is key, and one of the most effective tools for scheduling tasks in the Linux world is Cron. I’ll guide you through setting up Cron jobs to run your VM backups automatically at specified intervals, ensuring that your data is consistently protected without manual intervention.
Advertisement Begins
Advertisement End
Automating Backup Rotation with rotate-backups
Now that you have automated your KVM VM backups, it’s essential to think about backup rotation. Over time, your backup storage can become cluttered with older backups that you may no longer need. To address this, I personally the rotate-backups Python library.
The following sections are available:
rotate-backups is a versatile tool that can automatically manage the rotation and retention of your backup files. By defining rules in a configuration file, you can specify how many backup copies to keep, when to delete older backups, and more.
To get started, create a configuration file /etc/rotate-backups.ini, and configure it with the directories containing your backups and the retention settings you require. Below is a sample rotate-backups.ini configuration for my setup.
# /etc/rotate-backups.ini:
# Configuration file for the rotate-backups program that specifies
# directories containing backups to be rotated according to specific
# rotation schemes.

# VM BACKUPS

[/mnt/backup/BACKUPS_VMS/OpnSense-2023]
daily = 0
weekly = 8
monthly = 4
syslog=on
By integrating rotate-backups and fine-tuning your configuration, you can ensure that your backup storage remains organized, space efficient, and that you’re only retaining the necessary backup snapshots. This addition enhances the overall effectiveness of your home lab backup strategy, making disaster recovery a smoother process.
It’s important to note here, backup rotation should only apply to automated, scheduled backups. If you are manually running the backup script you may want to preserve all such backups. In that case, move them to a special directory, in my case I am using BACKUP_VMS_MANUAL for that purpose.
Here is the rotate-backup output for the sudo rotate-backups -v command using the configuration file above by default.
Command Output
2023-09-25 13:00:29 tower rotate_backups[1565531] VERBOSE Loading configuration for /mnt/backup/BACKUPS_VMS/OpnSense-2022 ..
2023-09-25 13:00:29 tower rotate_backups[1565531] INFO Scanning /mnt/backup/BACKUPS_VMS/OpnSense-2022 for backups ..
2023-09-25 13:00:29 tower rotate_backups[1565531] VERBOSE Confirmed that location exists: /mnt/backup/BACKUPS_VMS/OpnSense-2022
2023-09-25 13:00:29 tower rotate_backups[1565531] VERBOSE Confirmed that location is readable: /mnt/backup/BACKUPS_VMS/OpnSense-2022
2023-09-25 13:00:29 tower rotate_backups[1565531] INFO Found 2 timestamped backups in /mnt/backup/BACKUPS_VMS/OpnSense-2022.
2023-09-25 13:00:29 tower rotate_backups[1565531] VERBOSE Confirmed that location exists: /mnt/backup/BACKUPS_VMS/OpnSense-2022
2023-09-25 13:00:29 tower rotate_backups[1565531] VERBOSE Confirmed that location is writable: /mnt/backup/BACKUPS_VMS/OpnSense-2022
2023-09-25 13:00:29 tower rotate_backups[1565531] INFO Preserving /mnt/backup/BACKUPS_VMS/OpnSense-2022/2023-09-23-114745-OpnSense-2022-backup (matches 'weekly' and 'monthly' retention periods) ..
2023-09-25 13:00:29 tower rotate_backups[1565531] INFO Preserving /mnt/backup/BACKUPS_VMS/OpnSense-2022/2023-09-24-185916-OpnSense-2022-backup (matches 'daily' retention period) ..
2023-09-25 13:00:29 tower rotate_backups[1565531] INFO Nothing to do! (all backups preserved)Ensuring Data Security and Disaster Recovery
Regular backups are a crucial part of any disaster recovery plan. I discuss the main reasons why backups are important in the linked article.

FAQ (Frequently Asked Questions)
Q1: Why should I automate VM backups in my home lab?
A: Automation ensures that you consistently and reliably back up your virtual machines, reducing the risk of data loss and streamlining your backup strategy.
Q2: Can I use this script on any Linux distribution?
A: Yes, the script is designed to work on most Linux distributions. However, you may need to adjust paths or commands based on your specific distribution.
Q3: How often should I schedule VM backups with Cron?
A: The frequency of backups depends on your needs. It’s recommended to schedule daily or weekly backups, but the choice ultimately depends on your usage patterns and storage capacity.
Kitchen Multi-Timer Pro
Now you’re cooking
Multi Timer Pro is your ultimate meal prep companion, keeping track of multiple cooking times and making adjustments on the fly. Give it a try today and become a better home cook!

![]()
![]()
Q4: What other disaster recovery strategies should I consider in my home lab?
A: In addition to automated backups, consider off-site backups, redundant hardware, and disaster recovery testing to create a comprehensive disaster recovery plan. Personally, I use multiple hard drives and a combination of MergerFS and Snapraid to keep my data safe. I found this to be a cost-effective solution that ensures data is accessible on healthy drives in the event of another drive failing, while also optimising the amount of available storage space.
Q5: Is it possible to restore VMs from the backups created by this script?
A: Yes, as the files are simply copied to a new location, you can restore any backup by shutting down your VM and copying the backed up image back to its original location. The KVM configuration can be used to detect any changes to VM configuration itself and restore that as well if required.
Conclusion
By implementing this KVM VM backup script and leveraging the power of automation, you can simplify your home lab management, enhance your backup strategy, and fortify your disaster recovery plan. Say goodbye to manual backups and hello to peace of mind knowing your data is safe and sound. Get started with the script, and take control of your home lab’s backup process today!