If you are thinking about running a website or blog on your Raspberry Pi, there is a real need to make your device accessible from the internet. This post shows how to set up a free, custom domain name for your router along with all the stuff needed to make it work.
The issue with this is that your internet modem is assigned a random IP address and this address can change at any given moment. The traditional way to allow remote access to your modem is using a static IP address assigned through your ISP. This can be expensive and is impossible in some cases.
Prerequisites
Before we start, make sure you have the following:
* An account on dynu.net, a free Dynamic DNS provider with lots of configuration options
* get a free .tk domain name at dot.tk (make sure you sign up, we need admin access later)
* enable port forwarding on your ISP account to enable TCP port forwarding to your modem
* have a service running on your Raspberry Pi (or other network device) that you want to make available outside of your home network
Steps
- Forward external modem port to Raspberry Pi
- Set up Dynamic DNS between your modem and the DDNS provider (dynu.net)
- Link custom domain name to Dynu name servers
- (Optional) map subdomain to port
Step 1: Set up port forwarding on your modem
The instructions for this vary for different modems. The objective is to forward a modem port to your Raspberry Pi port. For webservers this is usually port 8080, however it can vary depending on the application you want to make externally available.[1^]
A quick Google search should tell you how to achieve this for your particular modem.
Step 2: Set up Dynamic DNS between your modem and the DDNS provider (dynu.net)
Since your modem's IP address changes arbitrarily, we need a mechanism to map a static domain name to your ever-changing IP address.
Step 2.1: Create a new DDNS service on Dynu
- Click on
DDNS Serviceson Control Panel (or click here) - Click on
Addbutton on top right - Enter you domain name under "Option 2" and click
Add
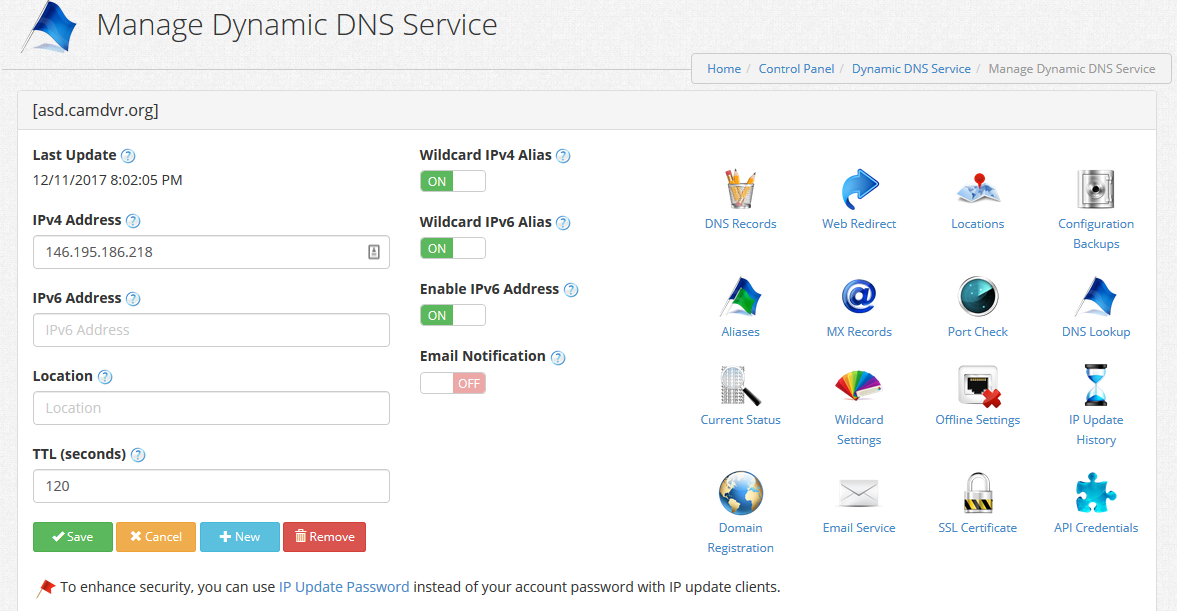
Your DDNS service has been created and your current IP address prefilled. The screen shown below allows you to configure the service.
Step 2.2: Update IP address automatically from modem
Most modems these days have the ability to send IP address updates to DDNS providers, notifying them every time the modem is assigned a new IP by the ISP.
Again, the instructions for this are modem specific. Dynu's help section includes instructions for a few common modem brands. If yours is not listed, googling setting up dynamic dns on <modem> should tell you how to do it.
You need your custom domain name (example.tk), your Dynu usrname and password and the IP address update link (supplied by Dynu).
Step 3: Link custom domain name to Dynu name servers
Now that we have established a reliable connection between our DDNS provider and our modem, which gives us a static address to access our home network, we need to link our domain name to Dynu's DNS server1. Doing this is relatively simple. All we need to do is tell our domain name provider to use Dynu's name servers (listed here).
- Log on to your
dot.tkaccount - Go to the Domains section and edit your domain
- Select custom name servers and plug in all of Dynu's listed name servers into the empty text fields.
Step 4: Map subdomain to specific port
If you have multiple applications running on your Raspberry Pi, each on a different port, then you will benefit from mapping a subdomain to those ports. Say you have notebook server running on port 5055. Rather than having to specify the port manually when accessing your domain (example.tk:5055) we can map port 5055 to a custom subdomain such as notes.example.tk.
This way you can have a few subdomains for different services such as ssh.example.tk, blog.example.tk and ftp.example.tk.
We can achieve this by clicking on the Web Redirect link, which takes us to the following page:

Under Node name you can specify the subdomain to use for the application running on your server. Make sure you select "Port Forwarding" as the redirect type. Leave Hostname or IP empty and enter the application port to redirect to. YOu can optionally check the Mask/cloak URL option to hide any query strings from view. This results in the browser displaying the hostname only in the address bar (e.g. notes.exmaple.tk rather than notes.example.tk/notes/1/edit?authenticity_token=123490). These query parameters are application specific. Cloaking URLs is highly undesirable if you want the URL to be bookmarkable by users.
Troubleshooting
- make sure your IP address is updated correctly. If you IP changed, and your router information is incorrect, then the DDNS provider will not be notified of the change. This results in your domain forwarding traffic to an outdated IP address. (check on dynu whether the listed IP is correct).
- If you are experiencing downtime due to unknown reasons, but your setup works perfectly at other times, it is possible this is the result of DDOS attacks. You are especially prone to DDOS attacks if your website is indexed by search engines. The scrapers themselves might be bombarding your server with requests. In this case you need to adjust the scraper/indexing settings.
Conclusion
You should now be able to access the services on your Raspberry Pi using a static domain name with subdomains for each service forwarded to a specific port on your Pi. This is a very neat setup. If you have any problems please get in touch through the comments section.
A note on security: It is important to password protect your applications and use SSL encryption whereever possible.
I will cover the installation of fail2ban and certbot in a future tutorial2, which will make the setup more secure.
{: .warning }
-
Dynu will convert your custom domain name to IP address currently assigned to your modem. This bridges the gap of the "unknown IP address". ↩
-
fail2banhelps prevent DDOS attacks by blocking known attacker IP addresses through traffic analysis.certbotallows the automatioc retrieval and validation of SSL certificates, allowing you to serve content viahttps. ↩

